First we will explain what this instance would be in our Oracle Cloud. An instance is just the name given by Oracle to a virtual machine. Just as you could potentially use VitualBox to create a virtual machine on your computer to run different applications, Oracle does this same process.
Using the “Always free” version you can create a virtual machine that allows you to use 4 Vcores and 24 GB of ram. With this virtual machine, you could run multiple applications.
In our case we will run most of our applications using Docker. This is due to the flexibility of the installations. You can test, modify, uninstall and everything will work efficiently.
One of the limitations of our Oracle cloud is the amount of weaponry we have. We can use up to 200 GB of our capacity which you can be deity in every virtual machine you want to create. But this means that if you create just one virtual machine for us, we will be able to use a maximum of 200 GB, which is not enough to create a vast library.
If you consider the average 1080p movie for us, you will find 3GB movies. But if you want better quality, like a 4K movie then you’ll end up using around 33GB. The size of a movie will depend on the length of this movie, and the “Bitrate” of the movie.
This means that you will be able to have an average of 60 movies in 1080p and a maximum of 6 movies in 4K. But I believe that no one wants to keep such a limited library.
Then comes the need to find other methods to understand our capabilities. One of those options would be to use the cloud system. There is still the need to use Rclone to make a connection between our cloud.
In our case, we will use google drive to make this connection. However, rclone offers a vast list of providers it can support. See wall of this list in the photo below.
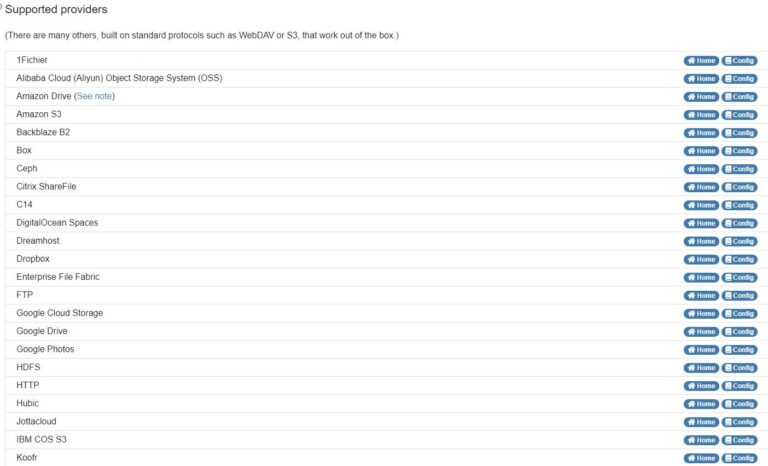
However, it is worth visiting the website: https://rclone.org/ to have access to the complete list.
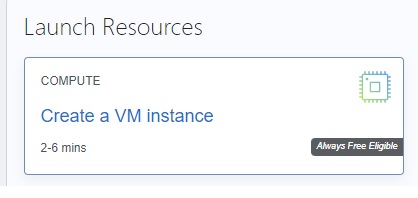
Now we will start our installation. First we must create our instance. For that we must create our virtual machine, so we will select “Create a VM Instance”.
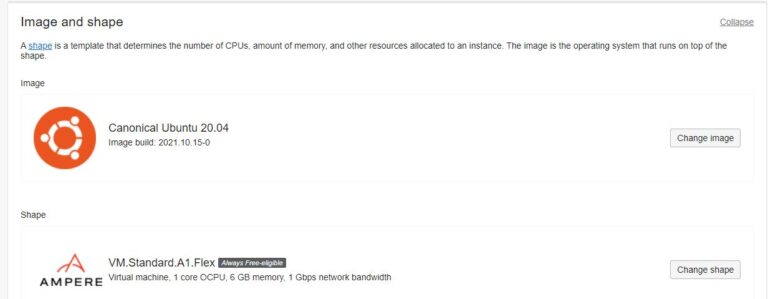
To create your virtual machine, the image we will be using is the Canonical Ubuntu 20.04 image. and the configuration of our machine will be Ampere with 1 core OCPU, 6 GB memory, 1 Gbps network.
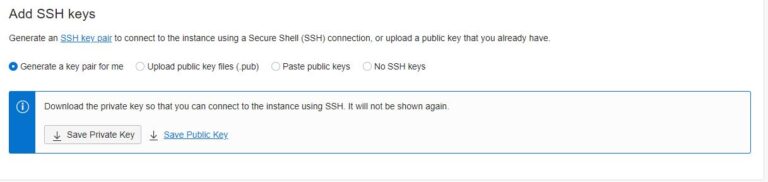
After that we will download our private key. Remembering without this key, you will not have access to your virtual machine so don’t forget to download this:
Now it’s time to create our virtual machine, just click on “create”:

Now you can access our virtual machine. To access this virtual machine, you will need to use its “Public IP Address” on the machine you just created. and the user this time will be “ubuntu”.
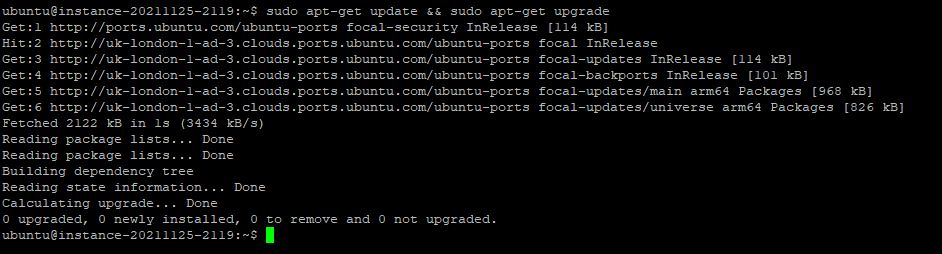
Once connected in your virtual machine, it will be necessary to update the system, so we must use the following command:
sudo apt-get update && sudo apt-get upgrade
Having finished making our update, you should see a page that looks like this:
Before installing Rclone, we must confirm that we have installed Curl, for that, we must use the command:
sudo apt install curl
So now we can install rclone, for that, we must use the command:
curl https://rclone.org/install.sh | sudo bash
To configure rclone we will use the following we must place the command:
rclone config
And now just follow the steps explained on the Rclone website https://rclone.org/drive/
No remotes found - make a new one
n) New remote
r) Rename remote
c) Copy remote
s) Set configuration password
q) Quit config
n/r/c/s/q> n
name> remote
Type of storage to configure.
Choose a number from below, or type in your own value
[snip]
XX / Google Drive
   \ "drive"
[snip]
Storage> drive
Google Application Client Id - leave blank normally.
client_id>
Google Application Client Secret - leave blank normally.
client_secret>
Scope that rclone should use when requesting access from drive.
Choose a number from below, or type in your own value
 1 / Full access all files, excluding Application Data Folder.
   \ "drive"
 2 / Read-only access to file metadata and file contents.
   \ "drive.readonly"
   / Access to files created by rclone only.
 3 | These are visible in the drive website.
   | File authorization is revoked when the user deauthorizes the app.
   \ "drive.file"
   / Allows read and write access to the Application Data folder.
 4 | This is not visible in the drive website.
   \ "drive.appfolder"
   / Allows read-only access to file metadata but
 5 | does not allow any access to read or download file content.
   \ "drive.metadata.readonly"
scope> 1
ID of the root folder - leave blank normally.  Fill in to access "Computers" folders. (see docs).
root_folder_id>
Service Account Credentials JSON file path - needed only if you want use SA instead of interactive login.
service_account_file>
Remote config
Use auto config?
 * Say Y if not sure
 * Say N if you are working on a remote or headless machine or Y didn't work
y) Yes
n) No
y/n> y
If your browser doesn't open automatically go to the following link: http://127.0.0.1:53682/auth
Log in and authorize rclone for access
Waiting for code...
Got code
Configure this as a Shared Drive (Team Drive)?
y) Yes
n) No
y/n> n
--------------------
[remote]
client_id =
client_secret =
scope = drive
root_folder_id =
service_account_file =
token = {"access_token":"XXX","token_type":"Bearer","refresh_token":"XXX","expiry":"2014-03-16T13:57:58.955387075Z"}
--------------------
y) Yes this is OK
e) Edit this remote
d) Delete this remote
y/e/d> y
But we’re not done with our configuration, for security reasons, we’ll configure the encryption of our data in our cloud, for that we’ll follow the steps to configure a new remote site: https://rclone.org/crypt/
No remotes found - make a new one
n) New remote
s) Set configuration password
q) Quit config
n/s/q> n
name> secret
Type of storage to configure.
Enter a string value. Press Enter for the default ("").
Choose a number from below, or type in your own value
[snip]
XX / Encrypt/Decrypt a remote
   \ "crypt"
[snip]
Storage> crypt
** See help for crypt backend at: https://rclone.org/crypt/ **

Remote to encrypt/decrypt.
Normally should contain a ':' and a path, eg "myremote:path/to/dir",
"myremote:bucket" or maybe "myremote:" (not recommended).
Enter a string value. Press Enter for the default ("").
remote> remote:path
How to encrypt the filenames.
Enter a string value. Press Enter for the default ("standard").
Choose a number from below, or type in your own value.
   / Encrypt the filenames.
 1 | See the docs for the details.
   \ "standard"
 2 / Very simple filename obfuscation.
   \ "obfuscate"
   / Don't encrypt the file names.
 3 | Adds a ".bin" extension only.
   \ "off"
filename_encryption>
Option to either encrypt directory names or leave them intact.

NB If filename_encryption is "off" then this option will do nothing.
Enter a boolean value (true or false). Press Enter for the default ("true").
Choose a number from below, or type in your own value
 1 / Encrypt directory names.
   \ "true"
 2 / Don't encrypt directory names, leave them intact.
   \ "false"
directory_name_encryption>
Password or pass phrase for encryption.
y) Yes type in my own password
g) Generate random password
y/g> y
Enter the password:
password:
Confirm the password:
password:
Password or pass phrase for salt. Optional but recommended.
Should be different to the previous password.
y) Yes type in my own password
g) Generate random password
n) No leave this optional password blank (default)
y/g/n> g
Password strength in bits.
64 is just about memorable
128 is secure
1024 is the maximum
Bits> 128
Your password is: JAsJvRcgR-_veXNfy_sGmQ
Use this password? Please note that an obscured version of this
password (and not the password itself) will be stored under your
configuration file, so keep this generated password in a safe place.
y) Yes (default)
n) No
y/n>
Edit advanced config? (y/n)
y) Yes
n) No (default)
y/n>
Remote config
--------------------
[secret]
type = crypt
remote = remote:path
password = *** ENCRYPTED ***
password2 = *** ENCRYPTED ***
--------------------
y) Yes this is OK (default)
e) Edit this remote
d) Delete this remote
y/e/d>
Having these two remounts created, we can check if everything is running successfully, for that, we will use the command:
rclone ls remote:
Having this connection working successfully, now comes the step of making our “mount” but we want this “mount” to be always present every time we restart our machine. For this we will create a “Fuse” configuration
For this we must install the program “Fuse” and we will use the following command:
sudo apt install fuse -y
Having installed this program, we must create our folder where the “mount” will be done and our Cache folder. This cache folder will be interesting to guarantee a buffer when running our media applications. So, you will have to use the two commands below:
sudo mkdir /mnt/cloud
sudo mkdir /mnt/rclone/cache/gmedia -p
With these steps completed we can start creating our service, but first we must log in as root using the following command:
sudo su
Now you can use the command below to create our service.
nano gdrive.service
In this service we will use the following script:
[Unit]
Description= RClone Mount Service
After=network-online.target
[Service]
Type=notify
ExecStart=/usr/bin/rclone mount \
–config=/home/ubuntu/.config/rclone/rclone.conf \
–user-agent=sauberlab \
–allow-other \
–timeout=1h \
–poll-interval=15s \
–dir-cache-time=1000h \
–cache-dir=/mnt/rclone/cache/gmedia \
–vfs-cache-mode=full \
–vfs-cache-max-size=20G \
–vfs-cache-max-age=12h \
crypt-gdrive: /mnt/cloud
ExecStop=/bin/fusermount -uz /mnt/cloud
Restart=on-abort
RestartSec=5
StartLimitInterval=60s
StartLimitBurst=3
[Install]
WantedBy=multi-user.target
After having modified the service according to your need, it’s time to move the service to the correct place, with that use the command:
sudo cp gdrive.service /etc/systemd/system
Having the service in the correct paste, we will activate this service so that every time we restart our computer this service will be indicated.
sudo systemctl enable gdrive.service
You have two options, you can restart your virtual machine, or you can use the command below which seems to be the best option:
sudo systemctl start gdrive.service
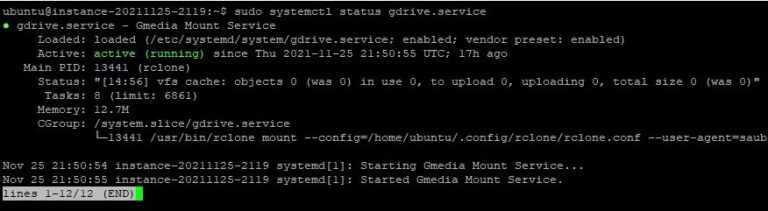
Regardless of your choice, now comes the time to verify that everything is working as expected, for that, we will run the command:
sudo systemctl status gdrive.service
If the message appears like the one in the photo below, it means that you did everything right, and this step is complete. With that you are ready to start installing the other media apps.
Pingback: Creating media system in an instance on Oracle Cloud – (Installing Jellyfin) - Sauber-lab
Pingback: Creating media system in an instance on Oracle Cloud – (Installing Emby) - Sauber-lab